
Friday, July 13, 2012

Wednesday, July 4, 2012
ANOTHER REVISED SCHEDULE!
Mavens, now that Petra has decided to pursue other interests and Wendy has joined us, I have revised the schedule. Some of you will notice that your assigned month has been changed. This affects everyone from Barbara on down, because Petra had formerly been the theme-chooser for November 15, 2012. Anyway, here is is. For those of you on this list, it might be a good idea to print this schedule off:
Andrea: theme #7 on July 15, 2012, for Sept. 15, 2012's quilt.
Alice: theme #8 on Sept. 15, 2012, for Nov. 15, 2012's quilt.
Barbara: theme #9 on Nov. 15, 2012, for Jan. 15, 2013's quilt.
Judy W: theme #10 on Jan. 15, 2013, for Mar. 15, 2013's quilt.
Kathy: theme #11 on Mar. 15, 2013, for May 15, 2013's quilt.
Sara: theme #12 on May 15, 2013, for Jul. 15, 2013's quilt.
Nedra: theme #12 on July 15, 2013, for Sept. 2013's quilt.
Wendy: theme #13 on Sept. 2013, for Nov. 2013's quilt
Friday, June 15, 2012
Kathy H's Dream Studio!
Greetings again, Mavens and others! I just posted about my fun day silk screening with Kathy H., one of our fellow Mavens. Now I want to show you photos of her state-of-the-art studio!


 |
| Behind Kathy's machine is a gorgeous piece of art which functions as a bulletin board. This was fabricated from steel which was blow-torched, resulting in various and gorgeous colors. My picture doesn't do it justice, because of the flash reflecting in its surface. But believe me, it is beautiful. |
 |
| Moving around to the left you see shelves with books, DVDs, etc. with a work surface running along the wall beneath the shelves. |
 |
| More of the same wall, the other side of the window. Kathy's Handi-Quilter is here. |
 |
| Behind a curtain are shelves on rollers where more supplies are store. |
 |
| Here is that closet with the curtain concealing its contents. |
 |
| The 4th wall holds more shelves. Kathy decoupaged fabric on the sides of these shelves to make them more attractive. |
 |
| In a study/guest room is a big closet where all of Kathy's quilts are stored. |
 |
| Behind the door to her studio, pegboard and tools. |
 |
| On the back of the door, a shoe caddy with more tools. |
 |
| This and the next pictures show the high shelves storing more necessities. Batting above. |


 |
| Threads of many varieties stored in bins, carefully labeled. |
 |
| A close-up of the thread bins. |
Adventures in Silk Screening with AB and KH!
Mavens, one month from today our Daydream quilt is due! Time seems to fly faster between each reveal and the next!
Kathy H. invited me to Gatesville (43+ miles from my front door to hers) to do some silk screening. She had given all the local Mavens and a few from our guild a demonstration lesson some time ago, but time ran out on us and we didn't get to do much actual screening. But kind Kathy invited me over for a day of fun. We screened in the morning, ate delicious sandwiches her husband assembled for us, and screened some more after lunch. Then Kathy gave me a quick lesson in free motion quilting.
I thought you fellow Mavens would like to see some photos of us at work and some of the results of my screening. No doubt someday some of this fabric will end up in a quilt for Material Mavens. I'll soon post again with photos of Kathy's state-of-the-art studio!
Kathy generously let me have some of her rust-dyed fabrics to experiment with! And of course, all the screens were hers. I brought my own paint--some of it was Setacolor, others were Liquitex. And the green was Kathy's--forget its brand!
Kathy generously let me have some of her rust-dyed fabrics to experiment with! And of course, all the screens were hers. I brought my own paint--some of it was Setacolor, others were Liquitex. And the green was Kathy's--forget its brand!
 |
| Kathy digging through a bin of rust-dyed fabric. |
 |
| Alice ironing some of the pieces she chose to screen print. |
 |
| Top, rust-dyed ticking with two different screen prints. Bottom left, a leaf print and a wonderfully intricate circle. Bottom right, blue bull's eye with a hard to describe gold screen print--you may have to click to enlarge to see it. |
 |
| Yet another piece of light aqua screen printed with a big screen, complicated design, and more of those wonderful gold circles. |
 |
| Close up of the dark fabric with the leaves and gold circles. |
Saturday, June 2, 2012
Mystery Quilt Mosaic
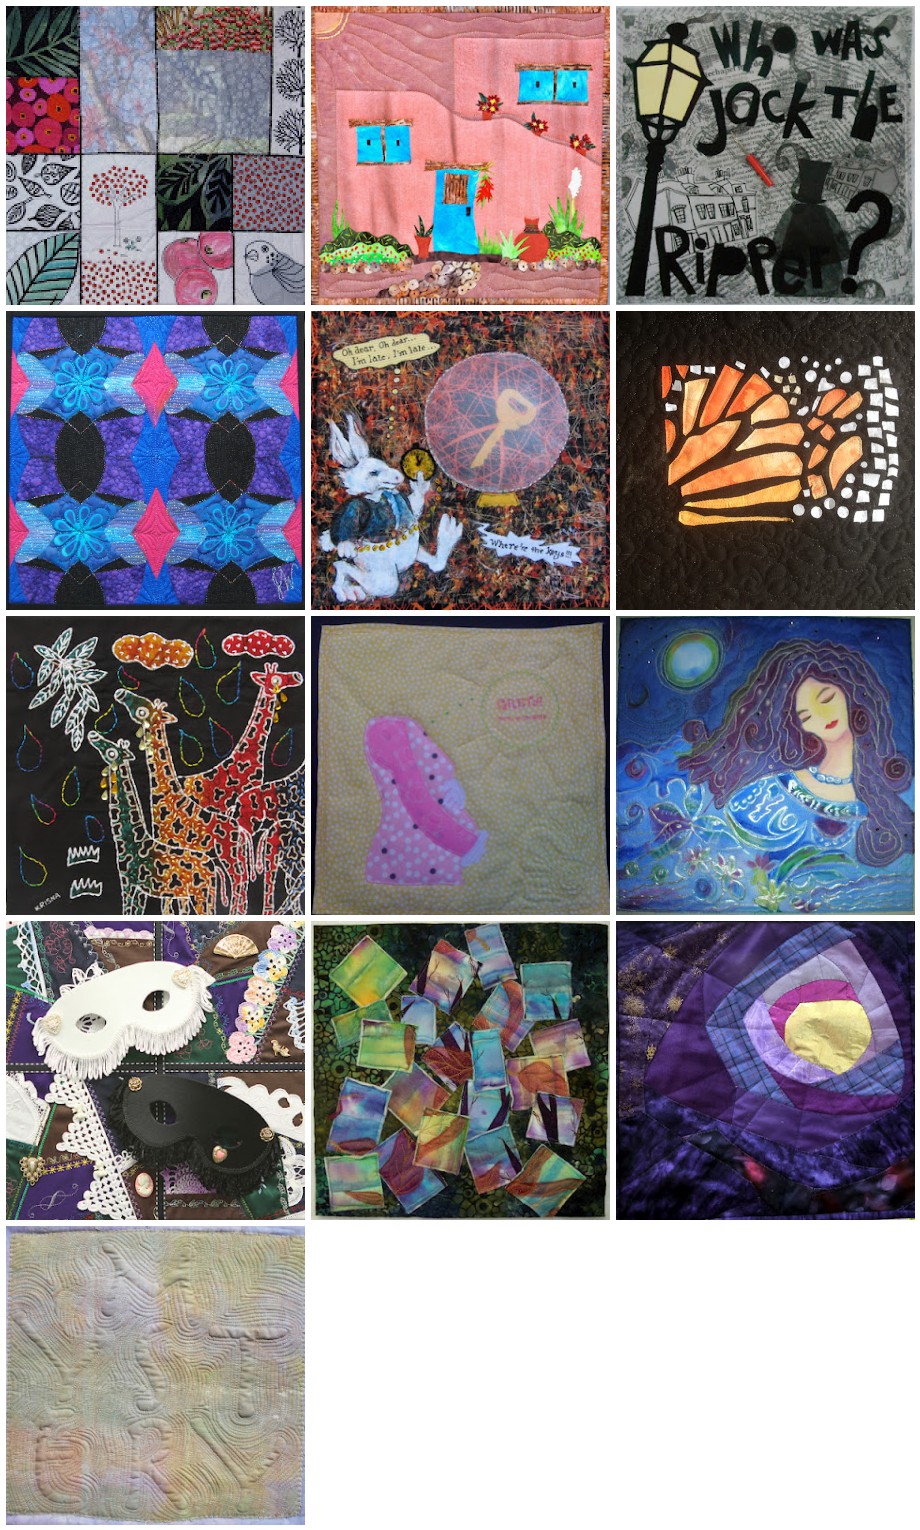
Here all the Mystery Quilts in a mosaic. Starting at the top, the quilts were constructed by Mavens Barbara, Carolyn, Andrea (first row); Judy W., Linda, Petra (second row); Alice, Patti, Nedra (third row); Rita, Judy S., Sara (4th row), and then making up the 5th row, Kathy.
Sorry it's taken me so long to assemble and post this, but I've been out of town and away from an accessible computer.
Anyway, these quilts are all so beautiful and varied, and it is so much fun to see them all together.
This particular program arranges the photos in no particular order than I can discover, but somehow, the arrangement ends up looking spectacular!
Enjoy, and send your friends an invite to look at them all!
Monday, May 21, 2012
Patti's Mystery Quilt - Baby Greta, Who will she be?

Thursday, May 17, 2012
Wednesday, May 16, 2012
And it is no longer a MYSTERY!
This has been an absolute delight for me to see how all of you put together your little quilt illustrating Mystery. Thank you for your talent, vision, and ability. And now to daydream.........................
Patti's Theme!
Dear MMs: I just got an email from Patti Brooks. She is having computer problems and so hasn't yet posted her latest quilt, nor has she posted about the theme. She emailed me and asked me to do so for her.
The theme for July is.........drum roll........DAYDREAMS!
A good one!
The theme for July is.........drum roll........DAYDREAMS!
A good one!
Petra's Mystery Quilt
Petra's Mystery Quilt,
Mine is a guess the animal quilt, so I'll leave it to you to guess for now

Mine is a guess the animal quilt, so I'll leave it to you to guess for now
Tuesday, May 15, 2012
Kathy's Alpha Mystery
The challenge was to decide how I wanted to portray "Mystery" and how to find just the right Alpha(bet) to accomplish the task. I found the perfect set of letters on a piece of fabric, cut out the letters I needed, then scanned them one-by-one onto my computer. I thought it would be a simple task to re-size the letters and then print them out to use as stencils. After several very frustrating hours of scanning, printing, re-printing, and going through two ink-jet cartridges and what seemed like a ream of paper, I abandoned the scanner / print / stencil idea. Next option was to use the fonts in my Mac "iPages" program. I found a suitable font, enlarged each of the letters I needed approximately 500%, printed the letters and used them as stencils. Okay.... the technical work was done.... now on to what I really love to do !
Using a stunning piece of ASPIDISTRA fabric created by Jack and Lila Bishop that I'd been saving for just the right project, I stenciled the letters onto the fabric, then free-motion quilted around each letter using Madeira Poly-Neon variegated thread. I echo-stitched around the letters to give them a shadow-y ["mysterious"] look and to make them look like they're floating on top of [or is it behind ?] the fabric. The next phase was to 'mount' the quilted letters onto another piece of hand-dyed fabric and to complete the pillow-case binding, the hanging sleeve, and the label.
Photography was next. Alice's suggestion to take the pictures outdoors was great, and it definitely makes the finished quilt look better. However, here in Gatesville, TX it was cloudy and overcast most of the day, and the rain seemed like it would never stop. The outdoor photos had to wait 'til late afternoon. Then then editing, and finally, this entry that will be posted to our blog ! Thanks for all the great challenges and the opportunities to experiment with new techniques and processes. See y'all in July :-D


Judy W's Mystery Quilt: "Mystery By Design"
 |
| "Mystery By Design" by Judy Wedemeyer (12" x 12") |
I created a curved line alphabet, assigning a line per letter, and then spelled out M-Y-S-T-E-R-Y to draft a 4" line design. That 4" line design was repeated in a 4 X 4 grid. (see photo below)
 | |||
| xerox repeat design on left, tracing paper copy on right |
 |
| quilting with metallic threads |
 |
| The first 6 letters of my curved line alphabet. The beauty of this concept is that I can change all the lines to create an entirely new alphabet ~ perhaps mixing straight with curved lines. |
Andrea's Mystery Quilt-Jack The (seam) Ripper
Ahhhh...I love a good mystery, especially a British one!
My first thought was Rebecca by Daphne du Maurier, then thought of, And Then There Were None by Agatha Christie. After a few days of considering those two options, I thought of Jack The Ripper, as I have been fascinated with him for as long as I can remember . At some point, after I decided that Jack would be my "victim", I realized that I have been associated with a "ripper" for the past 15+ years, so the concept of Jack The (seam) Ripper was born!
The background is silkscreened and rubber stamped on antique linen that I dipped in very watered-down black acrylic paint. The background images are from a photo of Big Ben and the Parliament buildings; a Victorian street map of the area in London where Jack committed his crimes; and a bit of information regarding the Whitechapel murders and the victims names. Even though I wanted this to be a whimsical piece, I felt a certain obligation to acknowledge the murdered women. The last surface design element is a large rubber stamp question mark. The houses are silkscreened on cotton, cut out and fused, "Jack" is fused black organza and the lettering is fused, free-hand cut out of black cotton. Originally I intended to include the word (seam) on the quilt, but thought an actual seam ripper would add a bit of tongue-in-cheek humor! I don't think they show up very well in the photo, but I made a number of slits into the background with the seam ripper also.

My first thought was Rebecca by Daphne du Maurier, then thought of, And Then There Were None by Agatha Christie. After a few days of considering those two options, I thought of Jack The Ripper, as I have been fascinated with him for as long as I can remember . At some point, after I decided that Jack would be my "victim", I realized that I have been associated with a "ripper" for the past 15+ years, so the concept of Jack The (seam) Ripper was born!
The background is silkscreened and rubber stamped on antique linen that I dipped in very watered-down black acrylic paint. The background images are from a photo of Big Ben and the Parliament buildings; a Victorian street map of the area in London where Jack committed his crimes; and a bit of information regarding the Whitechapel murders and the victims names. Even though I wanted this to be a whimsical piece, I felt a certain obligation to acknowledge the murdered women. The last surface design element is a large rubber stamp question mark. The houses are silkscreened on cotton, cut out and fused, "Jack" is fused black organza and the lettering is fused, free-hand cut out of black cotton. Originally I intended to include the word (seam) on the quilt, but thought an actual seam ripper would add a bit of tongue-in-cheek humor! I don't think they show up very well in the photo, but I made a number of slits into the background with the seam ripper also.

Sara's Mystery - The Mystery of the Beyond

Barbara's Mystery Quilt: MissTree

So, with our challenge word mystery, I wasn't sure which way to go with it and none of my ideas shouted to me. My daughter, Jodi, helped listen to my cranky ranting one evening and then inspiration happened!
We had a huge ficus tree in our front yard that covered our roof and dropped berries twice a year which would ferment if you didn't pick them up fast enough!! One year, a large branch broke under the weight of the leaves and berries. We had it taken out and its roots were traveling under our driveway and up under our front door step!
Do I miss that tree? No! (well just a little!)
So I used the grid, a lesson online at Joggles.com (Jane LaFazio's class Watercolor Sketchbook: Designs from Life) to pay homage to the missing tree. The large berries are inked on fabric and painted with Neocolor II watercolor crayons. I embroidered the grid in black perle cotton using a wrapped chain stitch. The french knots in the small berries and the roots of the tree are in embroidery floss. It's called MissTree. The missing tree was photo transferred onto ExtravOrganza (in the top right quadrant). The bird, an Ikea fabric, is looking for all those missing berries!
Nedra's "Mystery Lady"

When the new theme was announced, I thought of mystery novels first but wanted to venture beyond that interpretation of the word. I thought of songs with the word mystery in them and remembered a song by Billy Ocean called Mystery Lady which I love. I then pictured a lovely woman with dark flowing hair and
downturned eyes. I found a painting that almost perfectly portrayed the mystery lady I envisioned. Ronnie Biccard is the artist who painted the "Goddess of the Sea" which became my inspiration for "Mystery Lady". I have actually been in touch with her, received her permission to use her painting and post my version of it.

It was a great learning experience though as I used several new materials and techniques; crayons, thread, tulle, paint and crystals were used to complete the look. I started a blog called the Quilted Giraffe where I have posted past 12 X 12's. I have made 2 or 3 pieces for the previous themes, this one included. You will find pictures of the other renditions of the themes, the original Goddess of the Sea and how I created it and other work of mine at this address.
Linda’s Mystery Quilt: The Keys in Hiding ~ Again!

It’s an increasing MYSTERY where I have placed things!
In the midst of creating my first attempt at this mystery quilt, Que Sera Sera (below), the puzzle of children’s development, I needed a crystal ball and finally made one that doesn’t photograph as good as it looks. At the same time, I re-read Art and Fear, which gave me the nerve to paint the rabbit. I Googled Alice’s rabbit, Images, and sketched a composite, however anatomically challenged he is. I dove into my Lumiere textile paints and was surprised how slowly they built up compared with my other paints. I added a black permanent marker in spots. My background fabric awaited.
To make the crystal ball, I traced a saucer onto freezer paper and ironed the freezer paper to fabric. I folded in the edges (Katie P-M suggests spray starch) and blind-stitched it. I opened the backing and added polyfill. It needed more. In my stash I found this sheer fabric that doesn’t fray. I cut it out and used a spray glue to the edges. Next, I began to quilt things to batting. I took silver embroidery floss to stitch around the globe, after inserting a felt key. I also used embroidery thread on the clock.I needed bubbles for thoughts. I first photographed the piece and added it to Comic Life software to test bubble shapes and colors. Then I cut out fabric onto which I had ironed Wonder Under and printed the thoughts with Fabrico, a permanent marker. The fabric for the backside was too small, but I hastily glued it down and stitched over all with invisible thread to suggest the speed of the frantic rabbit. Perhaps some hands or fingers are needed to hover over the ball, but it’s late, it’s late!
Neither is perfect, but I made so many mistakes and learned several new techniques.That is a special bonus of art journal quilting!

Carolyn's Mystery Quilt - Santa Fe Doors

Santa Fe is my favorite U.S. city. I visit it often, and am always intrigued by the colorful doors of the adobe homes. I always want to know what's inside.
Santa Fe residents favor the color blue, which no doubt, is in honor of the deep blue of the glorious Santa Fe sky. Door colors range from soft periwinkle to bright turquoise to deep blue. No two doors are alike, and all serve as a welcome to those who pass by.
The city is known for its abundant gardens, and behind each door is a courtyard, often filled with beds or pots of various blooming flowers that thrive in the Santa Fe climate. Flower filled pots sit atop the adobe walls that separate the courtyard from additional buildings. Frequently, a string of red peppers hangs from the colorful door.
After taking a class from Laura Wasilowski, I fused hand dyed fabric using Wonder Under and cut the pieces freehand. I designed the quilt as it evolved in my mind. Each piece was appliquéd onto a hand dyed background fabric. Additional hand dyed and batik fabrics were prepared in the same manner and used for plants and details. I used a batik fabric for the walkway and then individually cut and appliquéd a border of stones from the batik fabric and placed them along each side of the entrance garden. The quilt was finished with hand embroidery (a new technique for me that I am exploring) and machine quilting.

Judy S. "Mystery of Nature"

I grew up on a farm in Missouri and love everything about
the country, especially taking walks in the woods. Discovering the tiny treasures
that are all around is so wonderful. I miss seeing the sweet little “May apples”.
I’m never home for a visit around that time of the year.
I would pick up treasures on my walks like milkweed pods,
acorns, and leaves to take home and make some little craft item. Several years I went out to the corn field
and picked the perfect cornhusks and silks to make cornhusks dolls. The silks
were carefully laid out on boards in the machine shed to dry and turn into
their beautiful reddish brown color for hair.
For this quilt I wanted to show a silhouette of a tree at
sunset or sunrise. Then I would overlay it with leaves. I used organza for the
leaves so that the background would show through and quilted the whole piece
adding detail to the tree and leaves. When I put it up on the design wall I
couldn’t stand it. It was just globs of color on fabric. There is no photo of
that stage because it really looked awful and there was no fixing it. I didn’t
think it would even be a component of my final quilt.
I never understood how an artist could throw away or paint
over something. This day I understood. I took it to the cutting table and just
sliced it up into pieces. Didn’t photograph that either since I just thought I
was cutting it up. Then I tossed the pieces into a pile.
Hmm, toss these onto a background fabric. The mystery is
trying to see the hidden pieces of nature in them. Once they were on the
background fabric I put a tiny smear of glue under each one to hold it
in
place. The quilting from the original one shows up well so, to make the
final quilt I only quilted around each individual piece. I kind of like
the batting and backing of the first quilt peeking out. The mystery of
nature,
art, and quilts all in one little 12x12 piece.

Rita's Mystery of the Mask


The fabrics are four colors of cotton sateen: green, purple, navy, and brown. I made four squares trying to alternate the colors to make it as 'crazy' as possible. I have many, many old linens and crocheted items that were made by my family or were 'found' items. I had pulled these together in the hopes of making a large Crazy Quilt at some point. I dug into this stash for this little quilt. Pieces of old doilies (remember doilies?), pillowcase trim, dresser scarf edging and other like fabrics were inserted into the seams of the sateen. This was then embellished with fancy stitches in many colors sewn on by machine with rayon machine embroidery thread. The four squares were then stitched together,edge to edge, and the seams covered with ribbon. The masks are constructed of heavy duty Pellon interfacing covered with heavy satin, trimmed with fringe. These are attached with permanent fabric glue to the Crazy Quilt background so they stand out dimensionally from the background. The final touch was the addition of period style art buttons.
As with all the rest of my Material Mavens offerings, this is also done as a gallery wrap around a twelve inch by twelve inch by three fourth inch deep frame. The second picture is to show this dimension.
Subscribe to:
Posts (Atom)