Monday, November 16, 2020

The Round Table Composite

Our internet connection gets so slow late in the afternoon (kids doing homework and at home playing video games) that, as I worked on this round's composite I was forced to consult an old-fashioned reference source, the World Book Encyclopedia.  Yes, we have a set, purchased for our 7-year old grandson who is an avid reader (and reads at this level).   All I could remember about the Round Table was "One for all, all for one!"  I thought I remembered the words "legendary."  It's a tale at least 1,000 years old.  Therefore, when this round's theme was announced, I suspected we would step back all those years--mostly.  But again your creativity surprised me.

The top row--Jane, Tricia, Kathy--lends a summary touch to our crazy world today.  We are, truly, spiraling out of control and longing for something as simple as a family "sit-down" together, over a good meal, and perhaps at a round table!

The second row is confession time for Randy.  Since I'm not, technically, a quilter, then, technically, I should not be allowed to voice an opinion for #1.  In another life I did present workshops on the use of humor to develop the skill of creativity and that tired old cliche of "think outside the box."  When I saw Judy's quilt, my first reaction was WOW, that's outside the box.  I invented my own prize, an Excalibur Recognition. I really don't mean to slight the rest of you, but Judy's just made me think, "Box, what box?"  Then Nedra's quilt just had to slip next to it to keep us focused.

Alice, if you really stretch your imagination, you can see an angel in that white cloud floating over your Wee Folk King, Queen, and Knight.  Plus what a gift you gave to your grandson to demonstrate what you can do with needle and thread.  I would expect nothing less from an experienced teacher and a loving grandmother!

To close the composite, a graffiti quilt from Gail, a swirl of confusion as to how to cope as we try to sort fact from who knows the truth.  Andrea, I couldn't resist, I put a mask next to your quilt because you so succinctly said "Social Distance."  Unfortunately, that says it all for these days.

Again, hold steady my friends; we will get through this--together!

Jobs well done.

Randy


Thursday, November 12, 2020

Judy S.: Let's Shake hands at the Round Table

To start with the Round Table I thought of many ways to modernize the Knights of the Round table, but they just didn't flow. One evening at my Camp Gladiator workout I talked to my friend Melinda who is a math teacher. "Is there anything interesting to do with math that would use a Round table?" She thought a minute and said, "There is one where there are 10 people around a table and you have to figure out how many total handshakes there would be if everyone shook each others hands." She continued to tell me that there is a visual where you draw different colored lines for each person and then you just have to count the total lines to get the answer. Oh WOW! I wish she had been my teacher! (Oh and as I was walking away she said, "There is an equation for it too.") Lol

I went online and discovered one where they used the 9 Supreme Court Justices as an example. That seemed appropriate with what was going on at the time. Guess what. Nine is not an even number to make an easy shape, but I got it! The close up shows the different ribbons, yarns and fabric I used to give each one their own color.
 
I basically couch/quilted the ribbons and yarns on. The back is fun to look at too with all the small zig-zag stitching.
Now to find the answer the red ribbon Supreme Court 
Chief Justice shakes 8 hands, Dark Green yarn Justice 7 handshakes, Gold ribbon Justice 6 handshakes, Lavender braided yarn Justice 5 handshakes, Pink ribbon Justice 4 handshakes, Blue ribbon Justice 3 handshakes, Orange fuzzy yarn Justice 2 handshakes, Light Green ribbon Justice 1 handshake and Dark purple Justice already shook everyones hand. So the total is 36 handshakes to go around the table.


Saturday, October 31, 2020


 Kathy's   "ROUND  TABLE"


I have to admit, when it was time for the "Round Table" Challenge, my very first thought was "Round Table Pizza !" 

[  We lived in Anchorage, AK for 35 years, and believe me...  "Round Table Pizza" was a pretty big deal for us...  Delicious, readily available in just about any combination you'd want,  AND... Free Delivery...  A super great bonus because of our weather and road conditions !  ]

I kept pondering how to put "Round Table" into one of our Quilts, and had, "by chance" recently ordered a book on "Crop Circles" that have intrigued me for many years.    How do they get those truly gigantic circles to be so perfectly "Circular" ?  How do they accomplish the extremely complex designs ?  How do they photograph the Crop Circles ?  So many questions ! 

As you can tell, "Crop Circles" became my theme, and I had a blast making this quilt !

The book, "Crop Circles, the Bones of God" by Michael Glickman has been (and continues to be) an enormous source of inspiration and information about these phenomenal structures.

All the fabrics in this quilt were "Rust Dyed" using old, rusted pieces / parts we continue to find in our pasture; and I have to admit, any time I see an old rusty piece of metal I tend to pick it up and add it to the stash  :-D

This particular Crop Circle, is called the "Angel Formation," and its one of my favorites.   It was "created" in July 2001, and is about 700 feet in diameter !


Andrea's Round Table Quilt


When Will We Be Reunited?
11" x 14"
cotton, silk screen, stencils, paint

This is a nod to the situation we continue to live with and the social distancing protocol restaurants have to follow.  Chairs have been separated from their tables, with many lined up against nearby walls just waiting to be reunited.  
After many weeks of struggling with this theme, I finally had an "Ah Ha" moment towards the end of September after meeting two friends for lunch.  This was my first restaurant experience since probably February, at a favorite Asian eatery.  Although we intended to eat outside at tables set up in the parking lot, it was a very hot, humid day so we decided to eat inside.  We were brought to an octagonally shaped room with a large round table in the center and smaller rectangular tables around the perimeter.  I suspect they can either seat a larger party at the round table or use every other smaller table for guests to remain 6' apart.

The chairs and chrysanthemum were painted using hand cut freezer paper stencils.  


freezer paper stencil

Jane Hartfield’s Roundtable Quilt

 Spinoff


Lately I have been spinning a bit out of control. COVID has kept me at home which gave me plenty of time to create. That was perfect six months ago. However, as time goes by, I tend to get distracted more easily. At times I feel like I just can’t focus. That means I have quite a few works in progress. Spin-off is one that I finished! It was fun to do and moved smoothly from start to finish.I entered it in Quilt National along with Coming Together. Both were rejected. 

At any rate, when a Roundtable begins to rotate and spin, it can throw off bits and pieces which can form new tables. 

This piece started as a mono print using thickened dyes and a piece of silk. I realized it needed more details and definition.
So I started adding paint using thermofax screens and just sponge brushes.
Next I had to start quilting. I added even more paint after that. I used Lumiere metallic paints to emphasize the spirals spinning off. I finished the quilt with a facing.

Happy Spinning!

Jane Hartfield

Gail’s Round Table Graffiti


 I recently completed a Graffiti Quilting online class with Karlee Porter.  I learned a lot!  Our final was a small graffiti quilt.  This one starts in the center and moves round in a clockwise or counterclockwise manner. Quilting in the round until the space is filled was so much fun that I can’t wait to use it on larger quilts.  

Friday, October 30, 2020

Nedras Round Table - Arthur's Realm


King Arthur immediately came to mind when round table was named as our theme for this reveal.  I explored other interpretations but kept returning to ideas of knights, swords, Camelot and castles so I ran with that idea.  Tintagel Castle was named by 12th century writer Geoffrey of Monmouth, in his historical account of British history,  as the place where the story of King Arthur and the knights of his round table was conceived.  My piece is a collage of Tintagel, a knight, a crest and a replica of the round table that King Henry the 8th had decorated with a tudor rose and the names of the knights of the round table and hung in Winchester Castle.  The original table was built of oak for a festival to celebrate the betrothal of one of Edward I daughters.   See this site for a picture of the real table and more details.   https://www.atlasobscura.com/places/winchester-round-table

The piece is composed of items that were fused onto stablizer and stitched before attaching to the background.  Normally I stitch after affixing to the background, but I found I prefer to work in this order as it allows more "margin of error".  The background was machine quilted also before I sewed the individual items onto it.  Commercial cottons and silk fabrics were used and embellished with  inktense pencils, stitching, tuille, etc. to create textures and detail.  Braid, beads and crystals finish off the details.  

I really had fun with this theme, although not totally engaged initially!!! 


Alice's Round Table Quilt: Camelot


I struggled with this theme, trying to think beyond the "knights of the round table" and come up with a  a broader theme. But then it occurred to me:  Why not the knights?

And so I constructed a quilt featuring one of the knights of the round table, Sir Lancelot.  I have always loved the musical CAMELOT that told the story of the marriage of King Arthur to Queen Guenevere and then her illicit romance with the handsome Sir Lancelot.  And so my quilt features these three characters in the form of Wee Folk dolls.

I learned to make these dolls years ago while baby-sitting with my four year old grandson Locke in New York City, while his mother was a summer session visiting professor at the Columbia School of Law.  Prior to their arrival in the city, I met Linda Hicks and she took me to the wonderful quilting store, City Quilter.  It was there that I found Salley Mavor's book FELT WEE FOLK.  Thinking that Locke
might enjoy making these dolls, I bought the book and some supplies.

We did make a few, but I learned quickly that these dolls are too challenging for a pre-schooler, but Locke did enjoy watching me make them.  Later on that year I made him a set of Robin Hood dolls for a Christmas present, as he was at that time a huge fan of Robin Hood.  I've included a photo of this set below.  When I showed them to Judy Steward, she said, "Alice, you ought to feature some of these in a future MM quilt!"  Well, it's taken a lot of years for me to follow her suggestion!  Locke is now a junior in high school!

I used wool for the background for my quilt, blanket stitching the sections down to a base, along with the castle and the tree.  The dolls are constructed from chenille stems (like pipe cleanser), wooden beads for the heads, and their clothes are made from wool and rayon felt.  I decorated the clothing with different embroidery stitches and then sewed them onto the dolls with the blanket stitch.  Their arms and legs are wrapped with embroidery floss, and their hair is wool fleece.  I inked the features of their faces with permanent markers.
 
With so much embroidery, I decided to forego any real quilting.  The quilt is also finished along its edges with more blanket stitching.  The dolls are tacked onto the quilt in strategic places and I was relieved that this "tacking" kept them from sagging on the quilt.  I confess that this quilt took me far longer than any other quilt made for this blog!  But I loved every minute spent in its construction!


Grandson Locke's Robin Hood dolls--Robin,  Maid Marian, and Friar Tuck


Thursday, October 29, 2020

Tricia's Family Round Table


When I thought about the theme, all I could come up with was the classic King Arthur's round table. After talking with my husband about the theme. We thought about the oak kitchen table that we purchased from an antique store we loved. The table was going into our kitchen. We just loved the wood and it came with leaves so we could accommodate many family members.  Many meals, stories, laughter and love are shared at the round table. A few years ago we remodeled our kitchen with an island that our family now sits around. The table has a new home in our youngest daughters house with new her husband. The round table will continue to have a life of family round table discussions of love, laughter and stories to be told. If the table could talk how many generations have sat around it before and probably after our family.

I created my piece by having my daughter photograph the table. I printed the photograph on fabric and cut out the table and chairs. I fused them onto fabric that looked like a wooden floor. Before fusing I machine quilted words in a circle around the table. A few of the words are love, laughter, family, togetherness, gatherings and hearts stitched in between the words.


Tuesday, August 18, 2020

The Garden Composite


Webster says – Garden (GAHR-nd) n. ground for growing flower, fruit, or vegetables – v. cultivate garden.
When I read the challenge for July my first reaction was, “Wow! I’m going to see someone do ‘fried green tomatoes' or at least, ‘home grow’d t’maiders [sic]’” Oh well! I added the vegetable garden myself to make sure we were all-inclusive in our endeavors. There is a hamburger joint in Fort Worth that serves fried leeks that will stop your heart. Now that’s gardening.
This composite came together with ease. I usually do all the “tweaking” first. Then, sit back and study the page and see if my imagination can visualize how they interact. Or, at least, which one will make a good middle of the page image. In a photo, just above center at the one-third line is often where we try to put a point of interest – such as the eye line of a portrait. That’s where I put the composite's “center.” Another photo trick is to put something in the image that will “lead” your eye to other points of interest – like Judy’s butterfly wings. They are right in the middle, but notice how they lead your eye to upper left and upper right, top row, and Alice and Carolyn’s quilts nicely frame Tricia’s garden.
The reds of Nedra’s and Jane’s quilts also frame the butterflies and the sweep of the quilting leads your eyes back to the middle.
Karen, we all know the importance of bees to any garden, be[no pun intended] it flower, fruit, vegetable, or field crop. It’s great you added one of the most significant insects in the 6-legged world to the collection.  [Did you know there are over 200,000 different kind of animals that act as pollinators?]
To start the description of the last row with “and that leaves” Andrea and Kathy” would seem to demean their quilts. Absolutely not! They both fit perfectly in that space, both in color and size to balance the corner and leave room for the label.
Thank you for letting me be a part of such a talented and creative group.

Randy

Wednesday, August 5, 2020

Judy's Butterfly Garden


It is such a delight to see a butterfly flitting around the yard. I don’t have a lot of flowers in my yard, but the other day my 3 year old grandson and I were blessed to see a beautiful butterfly swoop by us. It was in a hurray, but we both saw it and enjoyed that little spot of color fly by us.

The large butterfly is a leftover from a mandala quilt I am working on. It didn’t turn out perfect for that quilt, but it works fine for this one. The way I made it was to use freezer paper for my template and cut out the sections of the butterfly. I thought about putting silk, satin, or lace under the cutouts, but I looked up from where I was sitting and saw a bag of Angelina fibers. I played with laying out the different colors on top of each other so that there are gold fibers, holographic ones, and some darker ones to give it interest. Once I had the fibers laid out I fused them together into a large sheet. From there I chose where I would get the prettiest look on the butterfly and cut that out to fuse onto the back of the butterfly.


I had another piece of fabric that had the other butterflies on them which made it easy to fuse and cut them out. 

The flowers were hours of struggle. I took down my box of fused fabric and just started cutting up slivers of fabric. Boy, was that ugly! Then I went back to my fun petal shapes and the flowers were more like the summer time flowers I grew up with. I tried different colored fabrics and on this small piece it was too much, so I used the same fabric on all three flowers. I truly only had a small piece of it that fabric and it has been a favorite for many years. Now that fabric is all gone, but it is in some of my favorite quilts.

The grass blades are slivers from a hand dyed piece I made many years ago. The background is an ombre fabric made by Caryl Bryer Fallert  called “Essentials” for Benartex.


I read this quote and thought it was a good reminder for us during this pandemic. We are definitely going through a change that we didn't choose. "We delight in the beauty of the butterfly, but rarely admit the changes it has gone through to achieve that beauty." ---Maya Angelou

Monday, August 3, 2020

Kathy's "GARDEN" Quilt


This "Garden" quilt started with a toddler's "T-Shirt" that says "One of a Kind."  As soon as I saw the shirt, I knew it was going to become the focal point of my quilt.

I carefully cut the T-shirt, then used "Misty Fuse" to mount the front of the shirt to the white fabric that has a floral motif in the background.  I "Free Motion" quilted the background to add texture.  The trim around the sides of the quilt was hand stitched, and the heart shape and rectangular "Hot Fix" embellishments were affixed to the fabric with a special (very hot) heating tool.

I took the picture of my "Garden" quilt in our back yard.  The background is a small view of one of the 5 gardens we have that surround our home.    I'm very happy with this Little Quilt, and I hope all of you enjoyed your journey through "The Garden!"

Peace and blessings,   Kathy

Carolyn's Garden Quilt: Every Garden Deserves a Touch of Blue


I believe every garden needs a touch of blue.  But blue is also the hardest flower color to find.  For several years I have relied on a lesser-known flower, scaevola, to add a splash of color to my gardens.  It is commonly called “fan flower” for its left-handed, one-side blooms that resemble a fan.  Native to Australia, fan flower is a prolific bloomer, loves the heat, requires no dead-heading, and little or no fertilizer.  These features make it an almost perfect flower.  It is equally lovely as a well-behaved ground cover in front of plants or in pots trailing down the side of other plants.  It can be found in many colors - light blue, brilliant bluish/purple, pink and white.

My quilt is a representation of the very top of a blue scaevola plant using varying colors of solid 100% cotton fabric.  I first made a photo of my daughter’s fan flowers.  Then I cut out each piece of the flower, using copies of the photo as my patterns. The pieces were raw-edge fused onto the green background.  The quilting was done using multiple colors of Ricky Tims Art Studio threads.

I hope you will begin adding this little-known flower to your garden.  I promise it will bring you much joy.

Below are photos of this little-known flower!

[Alice posted for Carolyn who was having computer problems!]


Saturday, August 1, 2020

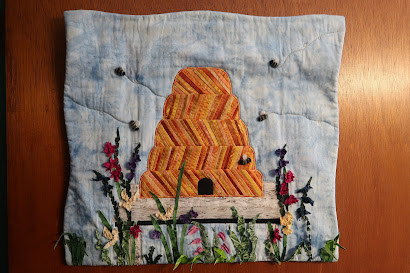
Karen's Bee Skep


Started a while ago for a class sample, dug out and enhanced with more flowers for the Maven's.
Flowers are made from torn, knotted or stitched scraps of batik fabric.
To make the skep, I drew out the shape, cut it into 5 sections. I free hand cut skinny strips of batik and stitched and flipped them onto muslin. Using the 5 sections as a pattern I cut my shapes out the stitch and flipped muslin and sewed them together. 
The bees are needle felted
Bee trails are stitched in using metallic thread.


(I am posting for Karen- Tricia)

Friday, July 31, 2020

Tricia and Pearl's garden

What a crazy year! In the past month and a half I have a new grand son and my youngest was married in a small ceremony. With Covid we had to completely change my daughters wedding to a small ceremony with only some of our family. Amazingly my son, his wife and our three  grand children were able to make it east for three weeks. I was trying to figure out how to create my garden when they were here. I decided to have my grand daughter, Pearl help me.

I created the background with clouds, grass and machine quilted it. I had several pieces of fabric with fusibles on the back. Pearl picked pieces and created flowers. We ran out of time. I will machine stitch our garden next week and post it with the stitching. It was so wonderful being able to play with fabric with my grand daughter.


Andrea's Garden Quilt


Old Garden Beach Memories
11" x  14
Fabric paint, hand cut stencils, 100% cotton.


Well, here is my Garden quilt, wrinkles and all!

I'm really pleased with the concept and design of this quilt, but absolutely hate the wrinkled background.  I've been trying to use less fusibles in my quilt construction, but that was a big mistake for this particular quilt.  Thursday morning I was going to start it all over again, but then realized I could end up with two unfinished quilts on July 31st., so I just "let it go" and continued to work on this one. 

When I first started to think about this theme, I was planning on making something based on a purple clematis plant in my garden, but when I was not motivated to start I decided that I needed a different approach.  I really don't know what made me think of this, but the idea literally came to me while showering about two weeks ago. I really enjoy designing and making quilts based on something personal.  

My childhood summers were spent in Rockport, a small town on the Massachusetts coast, about an hour north of Boston.  A few times during the summer we would walk to "Old Garden Beach" which was maybe a mile from my family's cottage.  Every house or cottage along the way had some type of garden, big or small.  I think these walks were my first introduction to gardens and specific flowers, especially those that are more commonly found near the ocean, such as beach roses ( Rosa Rugosa ) and hollyhocks. I really wanted to make something that reminded me of those very special childhood memories of hearing ocean waves crashing, salty air and beautiful gardens.

I spent many hours experimenting and agonizing over the "perfect" background.  I tried both paint and hand dyed fabric, but nothing was quite right.  After much frustration, I re-evaluated just what I wanted to emphasize and realized it was the flowers and Old Garden Beach sign ( which I believe was much smaller and more rustic when I was a kid ).  I then gave myself permission to just indicate with white on white, the sky, water, sailboats and grass, in order for the flowers to "pop".  I was really  pleased with both that decision and how it was looking until it started to wrinkle.

The fabric paint used was either applied using hand cut stencils or sponge.  A few french knots were added to attach the flower blossoms.


Old Garden Beach
Rockport, MA.
July, 2020

Field of Poppies


The theme word Garden conjures up all kinds of memories. I think I am getting old because everything seems to be tied to memories now.

I lived on a farm part of my younger years and garden was a source of food. My mother loved flowers, but never really had a flower garden. I remember trips to Natchez and to the Gulf Coast and admiring the beautiful azaleas. When we went to France, we were astonished by the beautiful poppies that grow as wildflowers.

Poppies are always associated with remembering people. They are also easier to quilt than hydrangeas which may be my favorite flowers.

My quilt has poppies I made from a silk scarf. The background fabric is one of the Stonehenge cottons. I painted on it with Inktense Blocks and thread sketched the petals and stems. The large poppy is three dimensional.

Nedra's Garden - Chihulys Paintbrushes


Several years ago there was a Chihuly exhibit at the Botanical Gardens in Atlanta.  Having been a fan for many years, I drove 4 hours to meet a relative to see the exhibit.  The displays were fantastic as I expected!!!  One of them included the gondola filled with glass balls which was fashioned into a stunning quilt by Melissa Sobotka several years ago.   I took many pictures but none of them really did justice to the pieces and their settings - I purchased the book to remember them as they really were!!

The background is composed of a batik print as a base with rectangles of dark batik fused  and then stitched on top.  The glass paintbrushes are made of batiks also which are machine stitched onto the background.   Simple curved stitching using a turquoise rayon thread and glass beads were used to add texture and contrast.  The colors are a bit washed out in the photo -- the stems are greener than they appear  The piece is 11 X 14.  

Of course my pictures from Atlanta came out terribly so I've included a link with a slideshow of the exhibit.  You'll see how stunning the Fern Dell Paintbrushes were in their natural beauty.

Alice's Garden Quilt--A Collage of Kaffe's Flowers


When I was straightening up the Elfa drawers that hold my stash, I went through my “purple” drawer.  Tucked into the bottom of it was a piece of sun-printed fabric that didn’t look familiar to me. When did I make this?  Then I remembered that I’d demonstrated sun printing at our MM retreat in Arkansas several years ago.  I went to the blog to look at the pictures I’d posted for that wonderful retreat.  Lo and behold, there I saw a photo of myself working on this exact fabric!  (I've included that photo below.)

I had decided to do a sort of collage of flower cutouts from my Kaffe Fassett fabrics, so next I sorted through that drawer.  Most of his florals are huge, really too big for such a small quilt.  But I found a few that would work.

I cut small sections of my chosen fabrics and applied a fusible product to their backs.  Then I cut around the flower motifs and arranged each on a square of the sun-printed fabric.  I used a fusible product that I have only occasionally used--Steam a Seam--but this proved to be a good choice.  Because it is “repositionable,” you can easily rearrange the appliqué shapes; they stick to the background but aren’t permanently adhered until you iron them down.  I arranged the appliqués such that some of the sun-printed flowers can be seen.

I bound it with more of the sun-printed fabric, and I quilted very simply with echo-quilting around the motifs.


This is the second Garden quilt I made!  My first one was a stringed pieced design, again using florals that were chiefly shades of purple, and it turned out all right, but somehow I wasn’t happy with it.  But it was already made, and so now it has become the back of my quilt.  So as I’ve done before on occasion, mine is a two-sided quilt! Below is the back of my quilt.  If I'd used this one, I'd have named it "String Pieced Garden Flowers."  


And here I am working on that sun-printed fabric:


Monday, May 4, 2020

The Paint Composite!


Another wonderful Reveal for this round. I did expect someone to “Paint” the rainbow, but you never disappoint with interpretations that continue the surprises from creative imaginations.
This composite fell mostly by color so Kathy’s took top center. Then it was easy to border the first row with the two flowers from Gail and Jane. The complimentary colors worked out attractively also. In fact, as I took a second and third look, the colors of the word “color” transitioned effectively into the flowers.
Second row, Judy’s paint brush, in way, points to the house tops of Carolyn’s circle. I grinned when I saw the mask in the middle and immediately thought of paint masks first and said, “Oh no!” My hardware store sold out of those when we could not longer supply N-95 masks. But now, those more appropriate masks are common place and many quilters have stepped up and contributed their talents and sewed them by the thousands.
What a sad state of affairs we are all suffering, illustrated in the bottom row. Stay at home – BUT – take special note of three icons: The bright sun beam in Alice’s quilt, the spring flowers in Andrea’s quilt, and the star on Nedra’s quilt.
Just remember, given time, this too will pass. Stay at home, keep quilting, and thank you for letting me play a small part in the joy of such a creative endeavor.
Randy

Saturday, May 2, 2020

Kathy's Paint Quilt


By far and away, "Paint" is my most favorite of all the "Material Mavens" Quilts I've made.  In this, one of the deepest times of trouble in our Country, and throughout the World, there are still beautiful colors to calm us; and with one word, "PAINT" we're able to imagine how beautiful our World will once again become.
I had been asked to make COVID masks, and thus became a "Maker of Masks," a task I'd never even thought about.  After watching several You Tube Videos about "How to make masks," I was fascinated with one of the alternative ways to keep the masks securely in place using something other than elastic.  Using common T-Shirts, I cut up several of my shirts into 2" strips; then.... the magic happens !  You take those strips, end to end, give them a Super Big Stretch, and they elongate into incredibly long, stretchy pieces of fabric that are perfect for easy-to-wear, and comfortable mask straps !

In the process of cutting up my T-shirts, I found one that said, "COLOR,  It's a Pigment of Your Imagination," and I knew right away this was going to be my quilt.  I also knew that somewhere in my Fabric "Stash" there was a remnant that looked like paint splatter … the hunt for that piece of fabric began !

After fusing a woven stabilizer to the back of the T-Shirt fabric, I appliqued that "Fussy Cut" piece onto a black, swirly cotton fabric, and "Free-Motion" quilted the fabrics together using monofilament thread (top and bobbin).  The binding fabric was cut on the bias, then attached to the quilt.

I'm so very grateful for the opportunity to have found the fabric to make this quilt; and am hopeful our World will be healed and consoled as we continue moving through this most challenging of times.   Peace and blessings to all.

Thursday, April 30, 2020

Judy's Paint the canvas

Painted canvas
I kept seeing paint dripping down a canvas so that’s what I made. The yellow and green fabrics are some that I hand dyed with my friend, Ellis Bennett. We did it in her garage in JULY in TEXAS. That tells you how much we wanted to dye fabric! Nobody would do that if they didn’t have a passion for quilting and creating.

The orange, blue, and purple are Cherrywood fabrics. They hand dye their own fabrics and are the ones who have a challenge every year. Last year was the Bob Ross challenge and this year is Diana.

The other part I couldn’t get out of my mind was the paintbrush. I wanted to be able to paint with it. All of these fabrics were in my stash and it was fun to rediscover them and make a paintbrush from them. I just cut out a section that looked like paintbrush hairs from McKenna Ryan’s line called “At Home In The Woods”. I had a little piece of gray that looked like metal and then the handle is a piece that I purchased from the Waco quilt guild president when she moved to Arizona back in 1995.


The paint was cut from a fun fabric called “Effervescence” designed by Amelia Caruso for Robert Kaufman. Sometimes it is so hard to use a fabric because you want to save it for just the right project. I’ve decided that now is the right time. This week I have cut into it 2 times and I still have some to use on other projects. I sewed squares of the right colors together and fused Bosal knit interfacing on the back to prevent it from fraying too much and to give it body so that it would paint nicely.
I sewed a vinyl sleeve to hold the paintbrush and paint. Enjoy.


Carolyn: "Can't Paint the Town Red"


My quilt reflects the Covid-19 Pandemic that we are currently facing with our quarantine and stay-at-home orders.  It features a circle representing the world-wide contagion with countries all over the world.  The coronavirus moves all around the globe, signaling the seriousness of this 2020 pandemic.  A blue mask reminds us of those caring for the infected and the urgency to wear a mask when we go outside to help contain the virus.  Only one of the homes is infected with the virus.  Can you tell which one?


I used a new Spring fabric by Kaffe Fassett for the background to communicate the world-wide goal of “flattening the curve.” The globe is purple reminding us of the hope for a vaccine.  Green grass signals an eventual return to a new “normal.”  The virus particles are fussy cut from another new Kaffe fabric, which resembles the coronavirus.  The same fabric is also used for the back and binding.  Each house is “painted” vivid red, but because each is unique, individual polka dot fabric tops each roof and door.  That is, except for the unfortunate, infected household.

The entire quilt is made with raw-edge fusing.  I tried a new thread for me – Wonderfil Invisifil 100 wt. with a #60 needle in tiny stitches for the entire quilt, except for the Ricky Tims 40 wt. polyester green thread for the grass.

This whimsical quilt reminds me to honor those who battle this virus, to stay hopeful, to do my part by staying at home, and to look forward to a brighter day. 


Andrea's Paint quilt


 Emerging Daffodils

12" x 12" 
screen printed and stencilled on cotton using 
transparent fabric paint


Up until last week I had a very different design idea worked out for my "Paint" quilt.  Although I liked the design, I was not motivated to even start it.  It was when I realized that I needed to create a piece that reflected, in some small way, just what is happening in the world now, that I came up with a new design.  Wash Your Hands; Social Distancing; Wear A Mask; Stay Home are a few of the phrases we are hearing everyday now, or at least in Massachusetts.

While staying home I have been appreciating watching my daffodils emerge in my little back garden, which I can see from my kitchen window.  The process of nature returning is about the only thing that seems "normal" now.  This was my inspiration.  It is a whole cloth quilt with all the imagery created using hand cut stencils and transparent fabric paint.  The background is screen printed with a "montage" of a few of my favorite images, mostly having to do with travel.  I intended the background to be a bit more "faded" than it is, as it represents the fading of life as I have known it.

"Where flowers bloom, so does hope"
Lady Bird Johnson

Some of the stencils that I used for the imagery.

Nedra's Paint - Paint the Town Red


The theme is incorporated in two ways for this challenge using paint as the inspiration and a method.
No matter how much I pondered, my mind always came back to the "Paint the Town Red " phrase.  So what better town to do so in than Las Vegas as I and a friend did when I turned 50!!!  

 I wanted to use obvious landmarks from Vegas for the skyline at the time of a warm southwestern sunset. The background is a combination of commercial and personal hand died fabric.  The landmarks are from some of the newer Vegas hotels, New York, New York, The Wynn, Luxor, Paris and Bellagio.  They are fused on and it is machine quilted.   Fingernail polish and fabric paint was used to create the drips.        


Gail’s Paint Quilt

I can still remember the first time I heard the descriptive term “thread paint”.  I thought ahhh yes that is what I am doing with thread.   Thread painting is what we all do with our art quilts.  Fabric and thread are our paints.  We have finally been recognized as artists without brushes but with needle and thread.  I so embrace this concept and this challenge!  My quilt is a silk panel given to me by Karen Sharp, a talented quilt artist.  I’ve looked at it for months. My familiarity with my Sweet 16 sit down midarm and the many threads Karen gave me inspired this little quilt.  I have reached a level of free motion quilting I only dreamed about.  Thank you Alice and everyone for this opportunity.  I used couching with metallic threads to outline the silk embroidered panel, yarn to embellish the border, and quilting on mySweet 16 for the background.